|
|


Applying the Cement
The First Coat
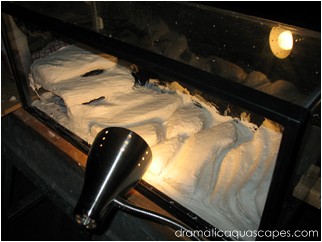
1. Using a 1 - 2 " disposable paint brush, apply the cement mix to all visible styrofoam surfaces. Just do your best to cover everything, but don't worry if some styrofoam is left exposed inside the compartments. It holds up just fine underwater and most fish will leave it alone.
2. Before the cement begins to harden, run your finger all the way across the top of the back just under the plastic frame to create a clean ½" or so of glass.
3. Using clean paper towel and single edged razor blade as needed, clean up any unwanted cement from the glass around the background. The acrylic and cement mix bond remarkably well to the glass once fully cured, so it's much easier to do the cleanup while the cement is still soft.
4. Allow the cement to cure in a cool, dry place for 24 hours before applying the second coat. Working in colder temperatures may require more time for curing.
The First Coat
1. Using a 1 - 2 " disposable paint brush, apply the cement mix to all visible styrofoam surfaces. Just do your best to cover everything, but don't worry if some styrofoam is left exposed inside the compartments. It holds up just fine underwater and most fish will leave it alone.
2. Before the cement begins to harden, run your finger all the way across the top of the back just under the plastic frame to create a clean ½" or so of glass.
3. Using clean paper towel and single edged razor blade as needed, clean up any unwanted cement from the glass around the background. The acrylic and cement mix bond remarkably well to the glass once fully cured, so it's much easier to do the cleanup while the cement is still soft.
4. Allow the cement to cure in a cool, dry place for 24 hours before applying the second coat. Working in colder temperatures may require more time for curing.
The Second Coat
1. Your second batch of cement mix will be slightly different than the first. Just add a few drops of liquid cement color. This is to make it easier to tell between the coats for better coverage.
2. Apply the cement with brush just as with the first coat and clean up any surrounding glass areas as needed.
3. Allow the cement to cure for 24 hours before applying the third and final coat.
The Third and Final Coat
1. For every cup of acrylic liquid, use 1 teaspoon of Quikrete cement color. If your background will have multiple colors, just use separate containers and brushes for separate mixes.
2. Apply the cement with brush just as the first and second coat and clean up any surrounding glass areas as needed.
3. Allow the final coat of cement to cure for 24 hours before continuing.
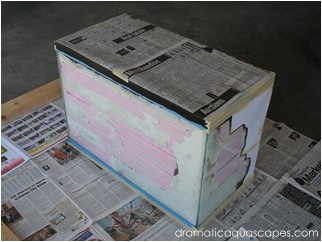
Painting the Tank Exterior
Note: The photos below were taken from a different project, but the process is the same regardless of your background design.
1. In a well ventilated area, lay out some newspaper to protect the surrounding area from paint overspray.
2. Using a small amount of rubbing alcohol and a paper towel, clean all exterior glass and allow a few minutes to dry.
3. Using plain white copy or printer paper, temporarily cover each end of the tank. and trace the outline of
your background through the copy paper. To help make tracing easier , try to position a light source to
shine through the glass from the inside of the tank to the outside through the paper. Sunshine or a desk
lamp works great for this.
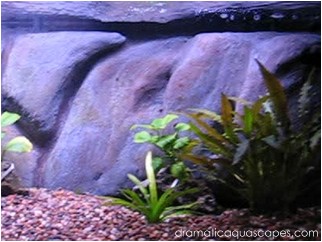
The goal is for the spray paint to completely hide where the pink styrofoam and cement are attached to the sides and back of the tank so you may want to trace and cut your lines to allow the exterior spray paint to slightly overlap the edges of your background.
4. Remove the copy paper, cut on your traced line and tape back in place as shown below. The copy paper should only cover clear glass, not the background.
5. Cover the top, front and all plastic trim using newspaper and masking tape. At this point, the only glass not covered should be where the background is attached on the back and sides.
How to Build Your Own
Custom Aquarium
Background
By Glenn Minor
Page 4 of 5
Custom Aquarium
Background
By Glenn Minor
Page 4 of 5