|
|


Aquarium Preparation
1. New or old tank, if you haven't seen it hold water recently, fill it up and let it sit over night to confirm there are no leaks. It would be quite heartbreaking to build your masterpiece only to find there's a leak now virtually impossible to repair concealed behind your background.
2. Using paper towel and some rubbing alcohol, clean all inside surfaces you intend to be in contact with the final background. This step is simple, but important to insure there's no oil or dirt to interfere with the silicone or cement bonding to the glass.
3. Study the glass front and back under a florescent light for any existing scratches to choose the best looking side to use as the front of the aquarium.
No Scratches Please
Once your masterpiece is complete, all will be at peace in your aquarium, however during the construction process, there's real potential for scratching the glass since cement on hands, tools and paper towels becomes abrasive (like rocks) very quickly once it starts drying. The precautions listed below should help avoid any unfortunate accidents.
1. Use clean paper towel instead of rags.
2. Use clean single-sided razor blades when necessary to scrape glass clean.
3. Temporarily cover inside front and side glass surfaces not intended for background placement with self-sticking cellophane. (This step is experimental. I haven't actually tried it yet.)
Choosing Your Design
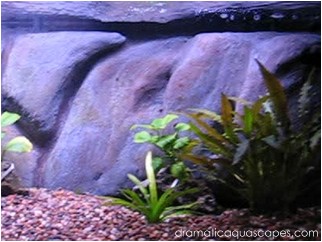
Pick a theme from memory, improvise a design, or find a picture to use as reference. The Internet is a great place for finding pictures of exotic rock formations. One suggestion is to try the Google "Images" search option with the phrase "rock formations" to start.
Important Design Guidelines
1. Styrofoam rock formations should be trial fitted before cementing. The tank may sit upright if you are using a stacking method for your background design, or if your rock formations are vertical as in the example project, lay the tank on its back. Another option for larger tanks is to use very small amounts of silicone to temporarily hold rocks in place during the initial design process.
2. Use the actual filters, power-heads, heaters, air-stones, etc, you intend to run in determining the length, width and depth of your hardware compartments. They should be easy to install and remove for maintenance.
3. Your background should stand at least 1 to 2 inches below the waterline. This measurement is important since air-stones will be used to promote water movement through the hardware compartment(s).
4. Hardware compartments should include significant openings "between rocks" or as "caves" near the bottom of the tank to allow adequate circulation through the compartments.
5. If you intend to use a HOB style filter, your hardware compartments should accommodate filter placement so intake tubes are hidden and water returns to the water column either to the left or right outside the compartment.
Note: For a canister filter setup, include a compartment on each end of the background in your design and position the intake on one end and the return on the other end. You might also consider building your background to accommodate either HOB or canister style filters for the sake of having both options later on. (I neglected to do this in the sample design below.)
1. New or old tank, if you haven't seen it hold water recently, fill it up and let it sit over night to confirm there are no leaks. It would be quite heartbreaking to build your masterpiece only to find there's a leak now virtually impossible to repair concealed behind your background.
2. Using paper towel and some rubbing alcohol, clean all inside surfaces you intend to be in contact with the final background. This step is simple, but important to insure there's no oil or dirt to interfere with the silicone or cement bonding to the glass.
3. Study the glass front and back under a florescent light for any existing scratches to choose the best looking side to use as the front of the aquarium.
No Scratches Please
Once your masterpiece is complete, all will be at peace in your aquarium, however during the construction process, there's real potential for scratching the glass since cement on hands, tools and paper towels becomes abrasive (like rocks) very quickly once it starts drying. The precautions listed below should help avoid any unfortunate accidents.
1. Use clean paper towel instead of rags.
2. Use clean single-sided razor blades when necessary to scrape glass clean.
3. Temporarily cover inside front and side glass surfaces not intended for background placement with self-sticking cellophane. (This step is experimental. I haven't actually tried it yet.)
Choosing Your Design
Pick a theme from memory, improvise a design, or find a picture to use as reference. The Internet is a great place for finding pictures of exotic rock formations. One suggestion is to try the Google "Images" search option with the phrase "rock formations" to start.
Important Design Guidelines
1. Styrofoam rock formations should be trial fitted before cementing. The tank may sit upright if you are using a stacking method for your background design, or if your rock formations are vertical as in the example project, lay the tank on its back. Another option for larger tanks is to use very small amounts of silicone to temporarily hold rocks in place during the initial design process.
2. Use the actual filters, power-heads, heaters, air-stones, etc, you intend to run in determining the length, width and depth of your hardware compartments. They should be easy to install and remove for maintenance.
3. Your background should stand at least 1 to 2 inches below the waterline. This measurement is important since air-stones will be used to promote water movement through the hardware compartment(s).
4. Hardware compartments should include significant openings "between rocks" or as "caves" near the bottom of the tank to allow adequate circulation through the compartments.
5. If you intend to use a HOB style filter, your hardware compartments should accommodate filter placement so intake tubes are hidden and water returns to the water column either to the left or right outside the compartment.
Note: For a canister filter setup, include a compartment on each end of the background in your design and position the intake on one end and the return on the other end. You might also consider building your background to accommodate either HOB or canister style filters for the sake of having both options later on. (I neglected to do this in the sample design below.)
Let's Make Some Rocks!
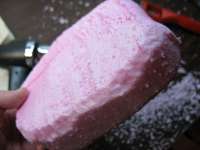
1. Using the Stanly Fat Max hacksaw blade, cut out a rock shape from
the large 4 x 8 piece of pink extruded polystyrene foam and trial fit it in
the aquarium. This is your chance to make rock shapes that stack well
and are aesthetically consistent from one to the next.
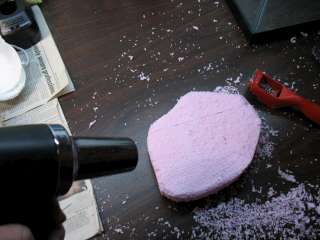
3. Using the 1000w hobby heat gun, slightly melt all surfaces to
further create a natural looking finish. Remember, this is no hair
dryer! Watch those fingers.
Suggestion: When melting very small pieces of styrofoam, use a bamboo skewer to hold the piece away from hands. Don't worry about the hole made by the skewer. It will be easily concealed with cement later on.
Suggestion: When melting very small pieces of styrofoam, use a bamboo skewer to hold the piece away from hands. Don't worry about the hole made by the skewer. It will be easily concealed with cement later on.
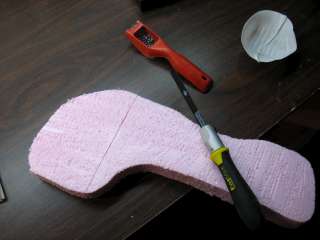
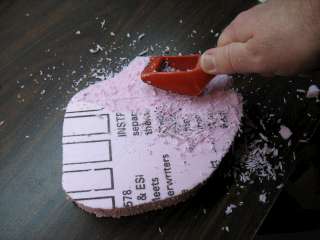
2. Using the Stantly surform shaver tool, remove all
smooth surfaces. This step is to improve silicone
and cement adhesion and make for a more natural
rock texture.
How to Build Your Own
Custom Aquarium
Background
By Glenn Minor
Page 2 of 5
Custom Aquarium
Background
By Glenn Minor
Page 2 of 5